
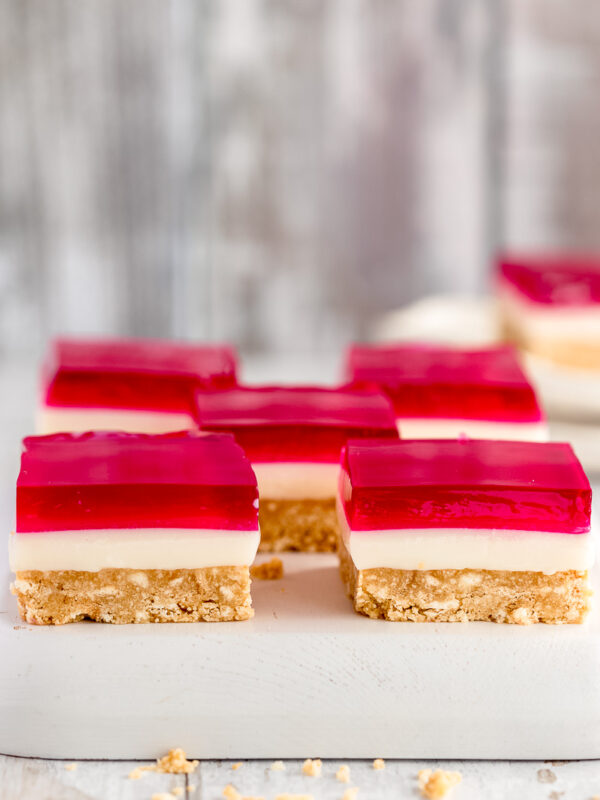
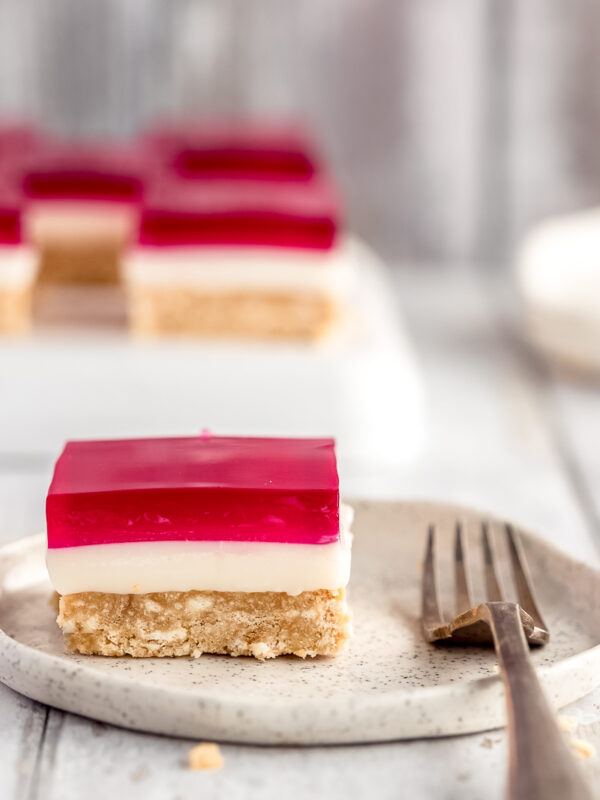
There's just something magical about a Jelly Slice. Those beautiful wobbly squares layered in buttery biscuit, creamy lemon filling, and bright red jelly aren't just a sweet treat, they're a ticket straight back to childhood birthday parties and family kitchen tables.
Save this recipe 💌
If you grew up in Australia in the '70s or '80s, chances are you have your own great memories of this nostalgic slice.
It was always there: balancing on paper plates, melting slightly at backyard parties, or lovingly packed into school lunchboxes.
This easy Jelly Slice recipe is from my Nanna Annie's no-bake recipes - slightly adapted to keep things super easy but every bit as delicious.
Ready to bring it back? Let's go.
❤️ Why You'll Love This Easy Jelly Slice Recipe
No oven needed: a true no-bake wonder.
Only 6 ingredients: nothing fancy, just pantry staples.
Simple technique: perfect if you're short on time or baking confidence.
She's pretty: those clean, colourful layers are a showstopper!
Overflowing with nostalgia: it's like a little edible time machine.
📝 Key Ingredients You'll Need
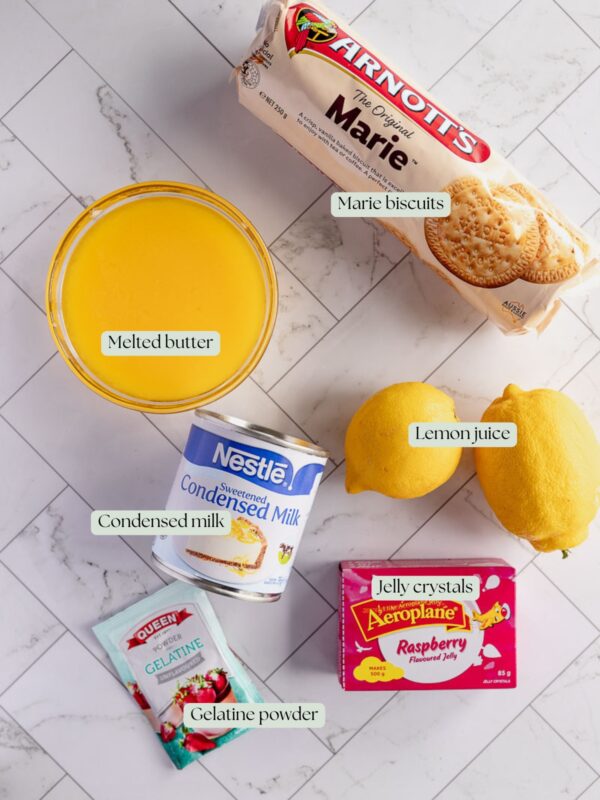
Marie biscuits: or any simple, sweet biscuit.
Melted unsalted butter: binds the biscuit base.
Sweetened condensed milk: rich and creamy deliciousness.
Fresh lemon juice: brightens the middle layer beautifully.
Gelatine powder: sets the creamy filling.
Raspberry jelly crystals: or your favorite flavour for the top.
🍯 Variations & Substitutions
Biscuits: Graham crackers or digestive biscuits work too!
Jelly Flavours: Strawberry, lime, passionfruit, or even blackcurrant or port wine for a grown-up twist.
Vegan Option: Use plant-based condensed milk and vegan jelly crystals.
👩🏼🍳 Step-by-Step Instructions
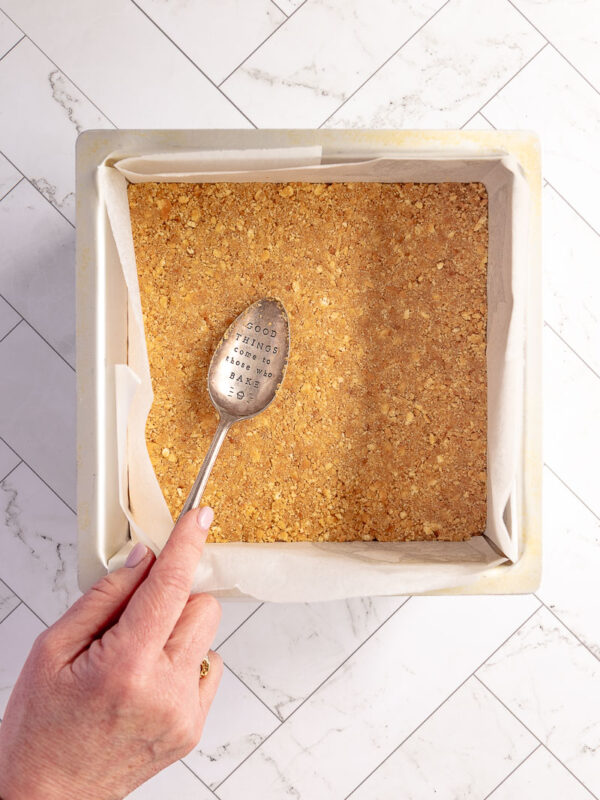
1. Make the Biscuit Base
Crush biscuits to a fine crumb (a few chunks are fine!) using a food processor or rolling pin. Mix with melted butter and press firmly into a lined 20cm square tin. Chill.
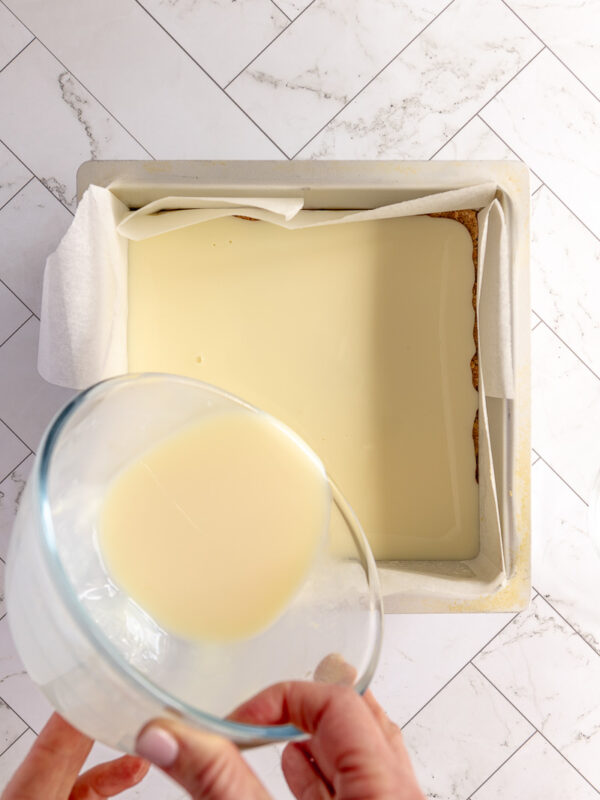
2. Whisk Up the Creamy Middle Layer
Whisk condensed milk and lemon juice together. Dissolve gelatine in hot water and whisk into the milk mixture. Pour gently over the biscuit base. Chill for 1-2 hours until firm.
3. Prepare and Cool the Jelly
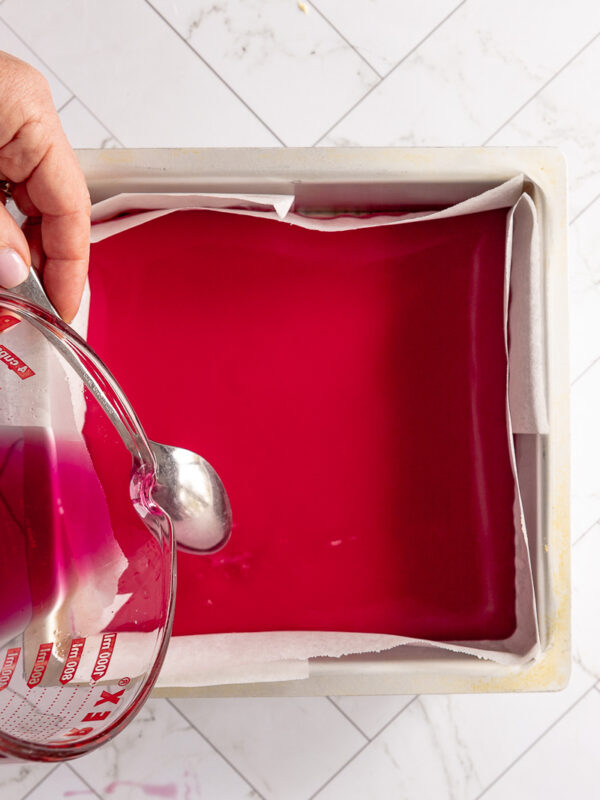
Dissolve jelly crystals in 1 cup boiling water, then stir in 200ml cold water. Let it cool to room temperature - not set, just cool!
4. Pour the Jelly Layer (Without Sinking It!)
Gently pour the cooled jelly over the back of a spoon to create a soft landing on the set middle layer. Chill for another 3-4 hours until fully set.
5. Slice and Serve
Use a small sharp knife to loosen the edges, then slice into even squares with a large knife.

💡 Expert Tips for Jelly Slice Success
Crumb Texture: Leave a few small biscuit pieces for extra crunch.
Jelly Temp: Jelly must be cool but still liquid. If it's too warm it will melt the middle layer.
Clean Slices: Warm your knife under hot water, wipe dry, and slice for clean edges.
🫙 How to Store Your Jelly Slice
Fridge: Store in an airtight container in the fridge for 3-4 days.
Freezer: Not recommended - the jelly texture doesn't survive freezing.
❓ Jelly Slice FAQs
Can I make this gluten-free?
Yes! Swap in your favorite gluten-free plain biscuits.
Why did my jelly layer sink?
The creamy middle wasn't fully set yet, or the jelly was too hot when poured.
How long does it take to set properly?
Give yourself at 4-6 hours for best results (or even overnight).
🔍 Explore More Delicious Nostalgic Recipes
Jelly Cakes: soft sponge cakes dipped in jelly and coconut and filled with Chantilly Cream.
Mars Bar Slice: chewy, gooey chocolate heaven!
Butterfly Cakes: pretty little party favourites that appeared at every childhood birthday party!
📸 Share Your Bake!
Tried this Jelly Slice? Please don't forget to share and rate it!
Tag me at @apple.cake.annie - I'd love to see your beautiful creations!
Easy Jelly Slice
Equipment
- 1 20cm square tin or equivalent size slice tin
Ingredients
Biscuit base
- 250 grams Marie biscuits (1 packet) or other plain, sweet biscuits
- 185 grams Unsalted butter melted
Middle layer
- 395 grams condensed milk (1 tin)
- 1-2 tablespoon fresh lemon juice, to taste 1-2 lemons
- 2 teaspoon gelatine powder
- ¾ cup boiling water
Jelly layer
- 1 packet aeroplane jelly, raspberry or preferred flavour, made as per packet instructions
Instructions
- Grease and line a 20cm square cake or slice pan. You can also use a rectangle slice pan, but I just like the straight sides on my 20cm tin
Biscuit base
- Crush the Marie biscuits with a rolling pin, then place the biscuit crumbs into a small mixing bowl. Alternatively you could crush them in a food processor.
- To the mixing bowl (or food processor) add the melted butter and mix to combine
- Press biscuit mixture into your prepared tin, pushing it down to the base of the tin and smoothing down with a metal spoon
Middle layer
- Now prepare your creamy layer by placing the condensed milk into a small bowl, then adding the lemon juice
- In a small bowl, dissolve the gelatin powder in boiling water. Add that to the condensed milk mixture and whisk it all together
- Pour the mixture onto the biscuit base, then refrigerate for 1-2 hours to set
Jelly layer
- While the second layer is setting, prepare your Jelly, as per instructions (I dissolve the jelly crystals in 1 cup of boiling water, then add 200ml of cold water. Leave it at room temperature, so that when the middle layer is set, the jelly has cooled, but is not set
- Pour on the top layer. I pour the jelly onto the back of a metal spoon, held just above the middle layer, so as to not disturb that second layer. It should be pretty well set, but you don't want a heavy stream of jelly messing with that beautiful, even layer!
- Allow the slice to set for 3-4 hours before cutting into squares
Notes
- The biscuit crumbs don't need to be too fine -some little chunks are ok
- Pouring the jelly over the back of a spoon disperses the jelly and prevents divots in your condensed milk layer
- I always make the jelly as per instructions and it works beautifully. If you want the jelly top a little firmer though, just use less water. Use 150ml of cold water, instead of 200ml
- If you would like the condensed milk layer a little firmer, add an extra teaspoon of gelatine powder to the second layer
- I use a small sharp knife to cut along the set jelly, where it meets the baking paper, for a clean edge
- Use a large sharp knife to cut the Jelly Slice into squares (you can use a ruler to mark every 5cm, to create even squares)
Fletch says
I’m only 25 but I feel like I’m back in the 1970s when I eat these