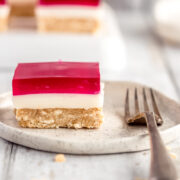
Easy Jelly Slice
This nostalgic Aussie slice is so simple, with 3 gorgeous no-bake layers. Perfect for afternoon tea, dessert and a stunning birthday party staple! Follow my step by step instructions to make this easy Jelly Slice
Servings: 16 squares
Calories: 233kcal
Equipment
- 1 20cm square tin or equivalent size slice tin
Ingredients
Biscuit base
- 250 grams Marie biscuits (1 packet) or other plain, sweet biscuits
- 185 grams Unsalted butter melted
Middle layer
- 395 grams condensed milk (1 tin)
- 1-2 tablespoon fresh lemon juice, to taste 1-2 lemons
- 2 teaspoon gelatine powder
- ¾ cup boiling water
Jelly layer
- 1 packet aeroplane jelly, raspberry or preferred flavour, made as per packet instructions
Instructions
- Grease and line a 20cm square cake or slice pan. You can also use a rectangle slice pan, but I just like the straight sides on my 20cm tin
Biscuit base
- Crush the Marie biscuits with a rolling pin, then place the biscuit crumbs into a small mixing bowl. Alternatively you could crush them in a food processor.
- To the mixing bowl (or food processor) add the melted butter and mix to combine
- Press biscuit mixture into your prepared tin, pushing it down to the base of the tin and smoothing down with a metal spoon
Middle layer
- Now prepare your creamy layer by placing the condensed milk into a small bowl, then adding the lemon juice
- In a small bowl, dissolve the gelatin powder in boiling water. Add that to the condensed milk mixture and whisk it all together
- Pour the mixture onto the biscuit base, then refrigerate for 1-2 hours to set
Jelly layer
- While the second layer is setting, prepare your Jelly, as per instructions (I dissolve the jelly crystals in 1 cup of boiling water, then add 200ml of cold water. Leave it at room temperature, so that when the middle layer is set, the jelly has cooled, but is not set
- Pour on the top layer. I pour the jelly onto the back of a metal spoon, held just above the middle layer, so as to not disturb that second layer. It should be pretty well set, but you don't want a heavy stream of jelly messing with that beautiful, even layer!
- Allow the slice to set for 3-4 hours before cutting into squares
Notes
- The biscuit crumbs don't need to be too fine -some little chunks are ok
- Pouring the jelly over the back of a spoon disperses the jelly and prevents divots in your condensed milk layer
- I always make the jelly as per instructions and it works beautifully. If you want the jelly top a little firmer though, just use less water. Use 150ml of cold water, instead of 200ml
- If you would like the condensed milk layer a little firmer, add an extra teaspoon of gelatine powder to the second layer
- I use a small sharp knife to cut along the set jelly, where it meets the baking paper, for a clean edge
- Use a large sharp knife to cut the Jelly Slice into squares (you can use a ruler to mark every 5cm, to create even squares)
Nutrition
Calories: 233kcal | Carbohydrates: 26g | Protein: 4g | Fat: 13g | Saturated Fat: 8g | Polyunsaturated Fat: 1g | Monounsaturated Fat: 3g | Trans Fat: 0.4g | Cholesterol: 33mg | Sodium: 115mg | Potassium: 122mg | Fiber: 1g | Sugar: 17g | Vitamin A: 355IU | Vitamin C: 1mg | Calcium: 85mg | Iron: 1mg