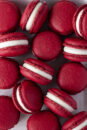
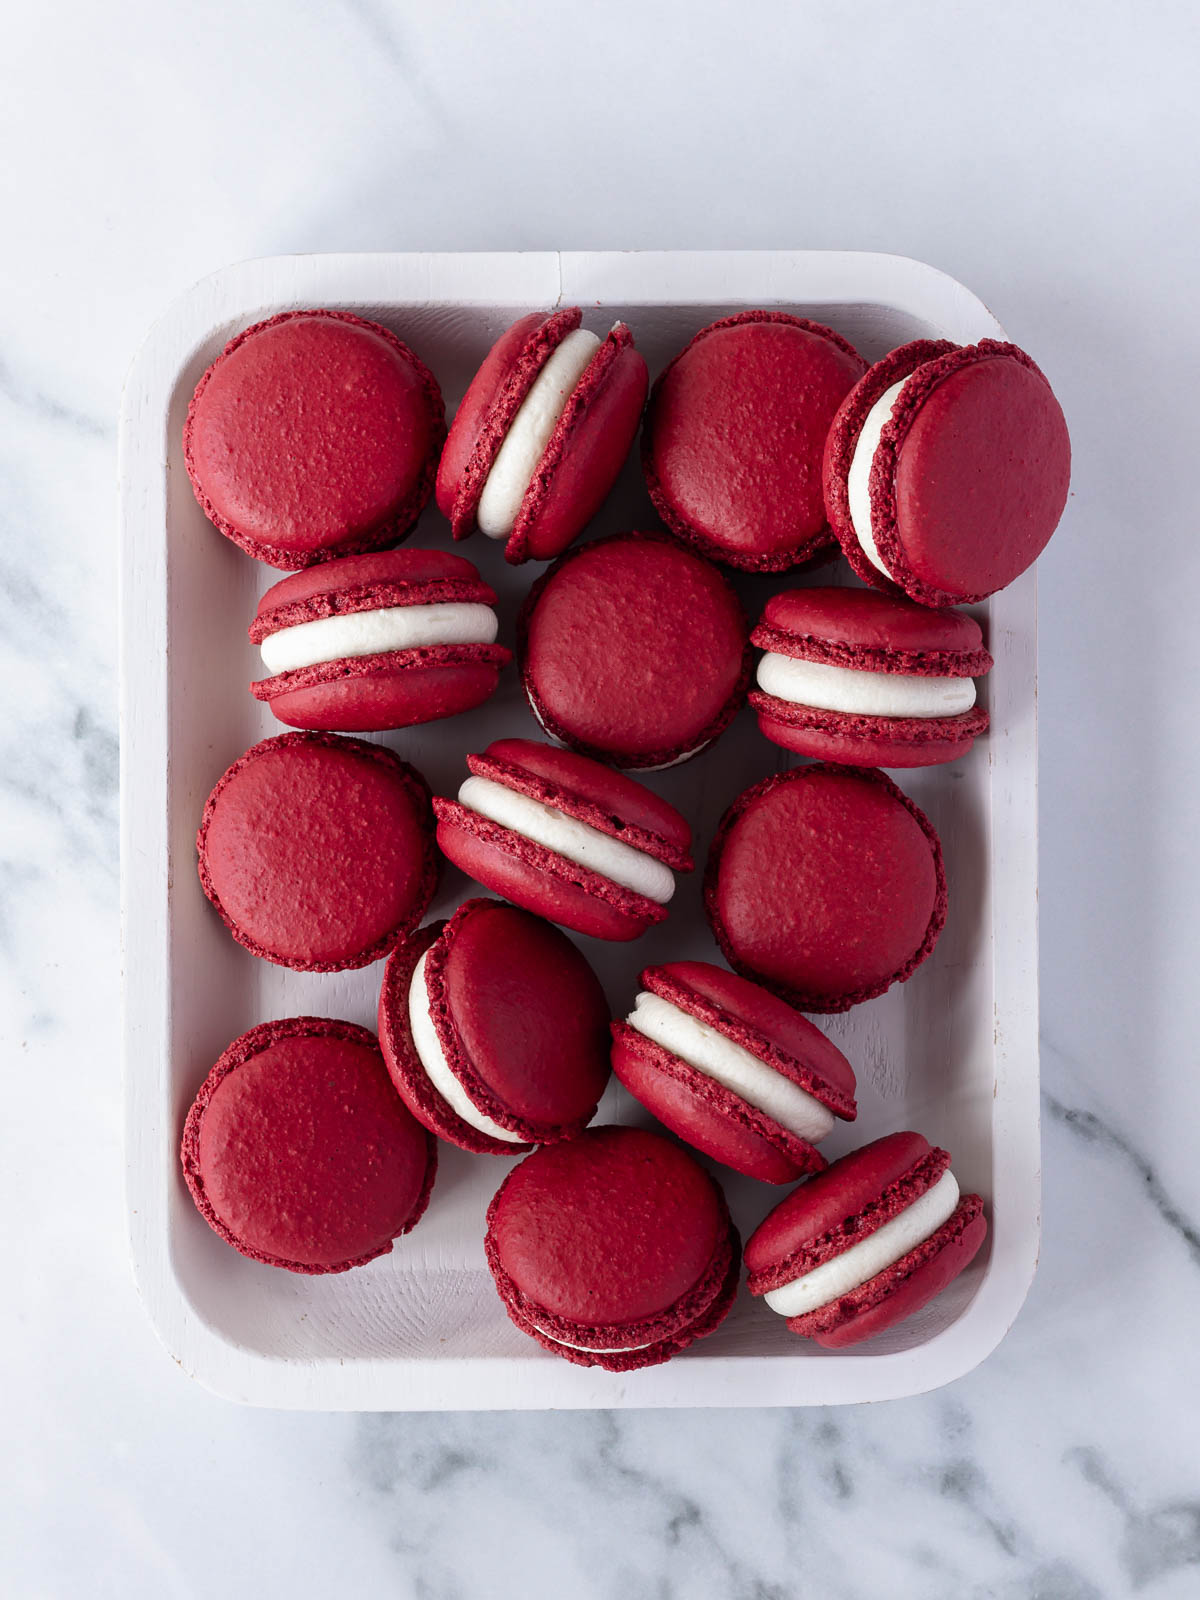
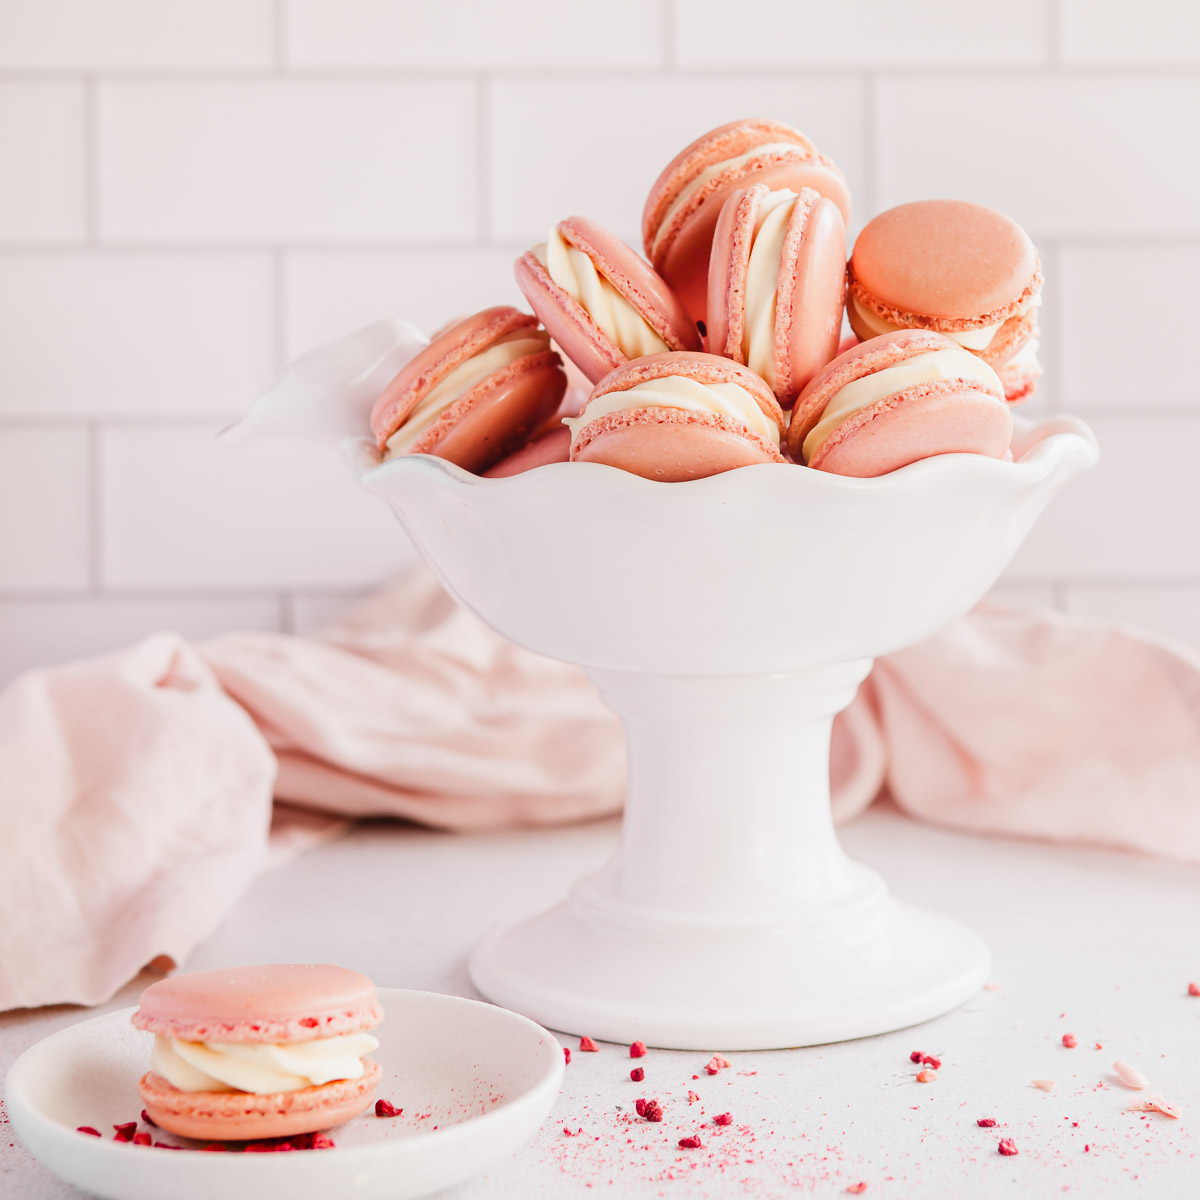
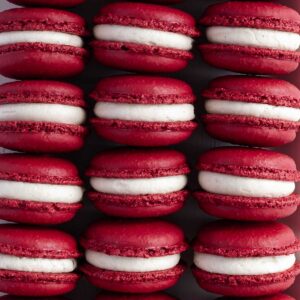
This Red Velvet Macarons recipe gives you deep red shells, smooth tops, perfect feet and a soft, chewy centre. With step-by-step guidance and process photos, you'll learn how to achieve the perfect red colour for a beautiful finish. The shells are filled with a silky cream cheese frosting, for a classic red velvet flavour.
Save this recipe 💌
You all know I love the Italian meringue method when making macarons. It's the best recipe for macarons thanks to its stability, shine and consistency. I bloom a concentrated powdered colour in a small amount of egg white before mixing the paste, so the colour disperses without needing liquid dyes. This avoids the wonky shells that happen when you add too much liquid colour. These Red Macarons are perfect for Christmas, Valentine's Day or any time you want a strong, vibrant shade, colourful Macaron.
Jump to:
Why You'll Love This Recipe
- Gorgeous deep red shells created with powdered colouring that won't affect the batter
- Classic cream cheese filling for authentic red velvet macarons flavour
- Includes step-by-step photos and professional tips
Recipe Ingredients

- Almond Flour creates that signature chewy texture; choose finely ground, skin-free almond meal or flour for smooth tops.
- Pure icing sugar blends with almond flour to form the tant pour tant
- Dutch-processed cocoa adds deep chocolate flavour and colour
- Caster sugar to make a sugar syrup
- Egg whites - divided into two parts (A + B) for structure and volume; aged whites give more stable foam.
- Red powdered food dye to avoid too much liquid in the batter (not shown).
See recipe card for full list of ingredients and quantities.
How To Make Red Velvet Macarons

- Step 1: Triple sift your almond flour, icing sugar and cocoa into a large mixing bowl. Sifting it onto a sheet of baking paper first makes it easier.

- Step 2: Add cream of tartar to egg whites (A) and use a handheld whisk on medium speed to form soft peaks.

- Step 3: Meanwhile, heat caster sugar and water over low-medium heat until it reaches 118 °C / 245 °F.

- Step 4: As soon as it reaches 118 °C / 245 °F pour the syrup into the beaten egg whites, with the mixer on low (I find using the hand mixer is easier and less messy than the stand mixer at this point).

- Step 5: Once the sugar syrup has been added, swap the bowl over to your stand mixer and continue to whisk on medium, until the meringue cools to 35 °C / 95 °F.

- Step 6: While the meringue is whisking, mix your concentrated red powder into a spoonful of egg whites (from portion B) until dissolved. Then combine this with your dry ingredients and the remaining egg whites (B) to form a paste.
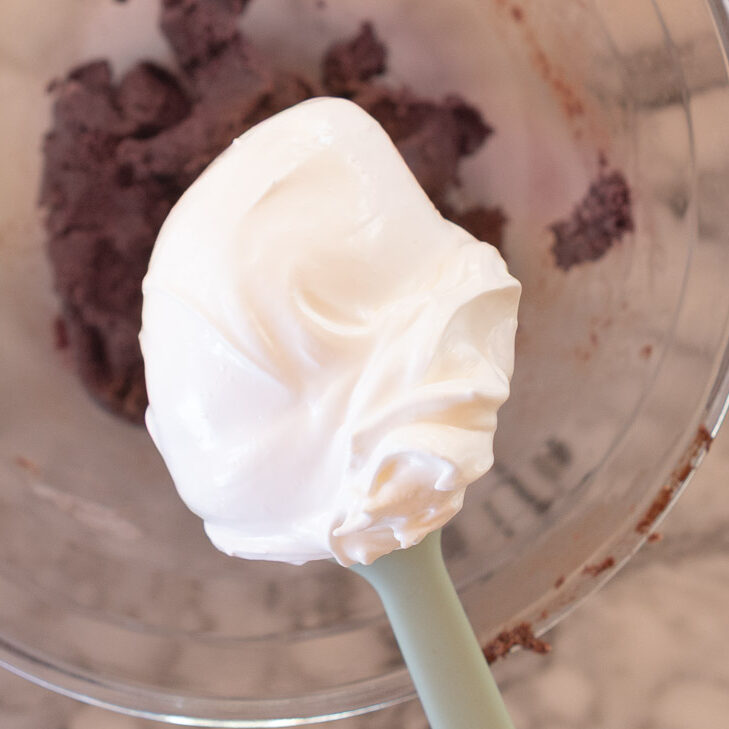
- Step 7: Soop out some of the meringue and mix it through the paste, to loosen it.

- Step 8: Add the remaining meringue in batches, then fold through, being sure to scrape and rotate the bowl. Continue until the mixture is smooth, shiny and the consistency of cake batter, but not too thin. I find a dough scraper allows me to really get in and mix the batter.

- Step 9: Place your piping bag (fitted with a 1A nozzle) into a tall jug, to make filling with the batter easy.

- Step 10: Once filled, place the bag into a bowl with both the ends pointing up. This can be used between piping trays, or when you need to place the bag down.

- Step 11: Holding the bag upright, pipe the mixture for a count of 2, then release pressure and give a little flick to release. Don't pipe to the edges of the circles, as the mixture will spread a little, then the macarons will be too big. Place a tea towel on your bench and gently tap the tray to release air bubbles. Rotate and repeat.

- Step 12: Use a toothpick to pop any remaining air bubbles.

- Step 13: Let the macarons rest for 15 minutes, when they should be no longer sticky.

- Step 14: Step 15: Bake macarons at 150 °C / 300 °F for 17 minutes. If they move when you try to wiggle them, leave them in for another 1-2 minutes. Once cooked, slide silpat mat off the tray and allow the macarons to cool completely on the mats. Turn over half the shells and pipe on your cream cheese frosting, then sandwich with the remaining shells.
Hint: Powdered colour gives you a strong red without altering the consistency of the batter. Blooming it first helps it blend evenly.
The perfect red macaron!
....it didn't have that funky food colour taste! " Lyn

Substitutions & Variations
- Christmas Red Velvet Macarons: add a white chocolate drizzle, gold shimmer or tiny fondant Christmas trees.
- Valentine's Red Velvet Macarons: top with mini fondant hearts or pipe a small white chocolate heart on each shell.
- Decorative shimmer: a touch of edible gold elevates them for gifting or special events.
See also: Chocolate Ganache for Macarons or Vanilla Buttercream for alternative filling options
Equipment
For best results, I use:
- Digital Scales
- Silpat macaron mats
- Hand mixer
- Stand mixer
- Digital thermometer
- Rubber spatulas
- Dough scraper
- Disposable piping bags
- 1A piping tip
- USA Pan baking trays
Storage
Store filled macarons in the fridge up to 5 days.
Freeze macarons up to 3 months.
Bring to room temperature before serving for best texture.

Top Tip
Prep your equipment first. Once the syrup reaches temperature, you need everything ready to go.
Macaron flavours develop and the shells become more chewy in a day, so it's better to make them the day before serving.
FAQ
You may need a more concentrated powdered colour. Liquid colour can fade or cause soft shells, so stick with powders.
Bloom powdered colour in a spoonful of egg white before mixing. It helps distribute colour without streaks.
Shells were underbaked, or not left to cool completely.
The batter was too thick and not worked enough -mix until mixture is smooth and ribbons off the spatula.
Yes, but the shells won't have that classic red velvet depth. Cocoa also supports colour intensity.
Best within 3 days once filled, though they can be refrigerated up to 5 days or frozen up to 3 months.
Both come from ground almonds, but almond flour is made from blanched almonds (skins removed), giving it a finer texture and smoother shells. Almond meal often includes the skins, making it slightly coarser and darker. For macarons, I always try to use blanched, finely ground almond flour (but the label may say "almond flour" or "almond meal")
Red Velvet Macarons
Equipment
- 1 Digital Thermometer I like this one, as it has an alert when you reach your desired temperature
- 2 Disposable Piping Bags 1 for macarons, 1 for filling
Ingredients
Macaron Shells
- 140 grams Almond Flour finely ground, blanched almonds
- 140 grams Pure Icing Sugar
- 20 grams Dutch Process Cocoa
- 55 grams Aged Egg Whites (A) see notes
- 55 grams Aged Egg Whites (B)
- pinch Cream of Tartar
- 150 grams Caster Sugar
- 38 grams Water
- ½ teaspoon Red Food Colour Powder I use The Sugar Art in Red Rose
Cream Cheese Buttercream
- 50 grams Butter room temperature
- 50 grams Cream Cheese room temperature
- 1 teaspoon Vanilla Paste
- 230 grams Pure Icing Sugar sifted
- 1½ tablespoon Cream
Instructions
- Preheat oven to 150°C/ 300°F and place an empty baking tray on the middle rack.
- Line baking trays with silpat mats (you'll need 4 mats, if you want to pipe the macarons all at once).
- Prepare a large disposable piping bag with a #1A piping tip and place the bag inside a tall cup/jug, ready to be filled (see post for tips on using the piping bag). And keep a large bowl nearby, to rest the filled bag when needed.
- Take a teaspoon of the egg whites (B) and mix it in a small bowl with the powdered food colour. This will bloom the colour.
- In a small saucepan, heat the caster sugar and water over low-medium heat. Make sure the water has covered most of the sugar and avoid stirring, as this will create crystals on the side of your pan.
- In the bowl of your stand mixer, but using an electric hand mixer, begin whisking the egg whites (A) and cream of tartar until frothy. Once the sugar syrup reaches 110°C, mix the whites on medium speed to form soft peaks, keeping watch of the syrup, as it must not go over 118°.
- As soon as the sugar syrup reaches 118°, remove the thermometer and (with the mixer turned to low) pour the syrup into the whisked egg whites in a thin, steady stream, being careful to avoid the whisk. This is the Italian meringue.
- Now place your mixing bowl onto your stand mixer with whisk attachment and increase speed to medium. Continue to whisk until mixture cools to 35°
- While it's whisking, combine the dry ingredients.
- Combine the almond meal, icing sugar and cocoa (this will be your "tant pour tant"). Now sift it 3 times into a large mixing bowl.
- Now add the remaining egg whites (B) along with the bloomed colour and mix with a rubber spatula, to form a thick paste.
- Once the Italian meringue has cooled to 35°, scoop some of it out with the rubber spatula and mix it into the paste to loosen it.
- Add the remaining meringue in a couple of batches and continue to fold through, scraping the bowl and folding the mixture over, whilst rotating the bowl. Make sure you scrape the bottom, to get all of the paste.
- Continue folding, scraping and rotating (macaronner) until the batter is smooth and shiny. Batter should have the consistency of cake batter and not too thin (see post).
- Scoop batter into prepared piping bag, then place the bag on the bench and press out air pockets. With the piping tip pointing up, twist the end of the bag and secure with a rubber band (I find twisting it is sufficient).
- Piping the shells: holding the nozzle end with one hand and the twisted end with the other, place the bag directly above the marked silpat mat and gently squeeze from the top hand. Release pressure before the batter reaches the inside edge of the circle and give the bag a little twist at the nozzle end, to break the release of batter.
- Place a tea towel onto the kitchen bench, then give a gentle tap of the tray, to release air bubbles. Rotate tray and repeat.
- Let macarons rest for 15 minutes, to dry a little.
- Place tray with the piped shells into oven and bake at 150°C/ 300°F for 18 minutes. Repeat with remaining trays. (I bake one tray at a time).
- How to tell if macarons are cooked: After 18 minutes check macaron shells -if they still wiggle, they're not quite ready. Give them another minute or 2.
- Once cooked, immediately slide silpat mat off baking tray and onto the bench to cool. Once completely cooled, shells can be gently lifted from mat (see post), put into pairs and filled with your chosen filling
Cream Cheese Buttercream
- Beat the cream cheese and butter with a hand mixer or stand mixer until pale and creamy (around 2 minutes).
- Mix in the vanilla.
- With the mixer on low, gradually add the icing sugar, adding the cream halfway through, then increase the speed to medium-high until light and fluffy (around 3 minutes).
- Pipe the buttercream onto half of the macaron shells, then sandwich with the remaining half. Refrigerate or freeze macarons in an airtight container.
Notes
- Check your oven temperature with an oven thermometer. Even 5 degrees can make a difference!
- I get best results when baking one tray at a time, in a conventional (not fan-forced) oven. However, all ovens are different and you need to do what works best for you.


Sandra says
This worked exactly as written, thanks!