

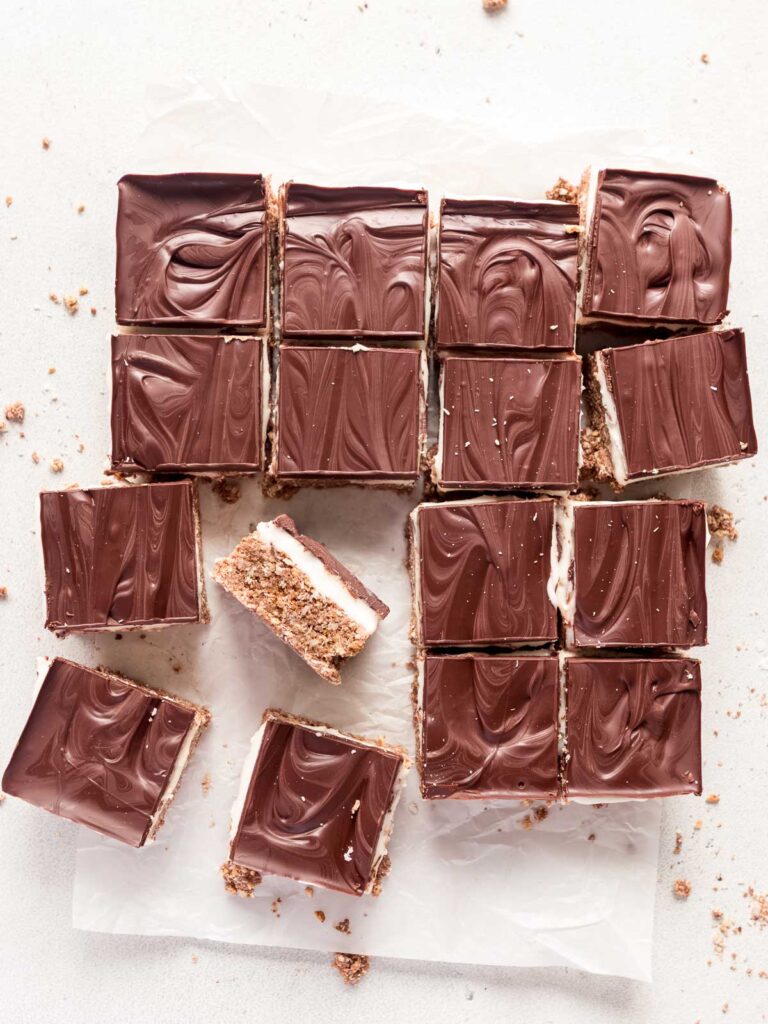
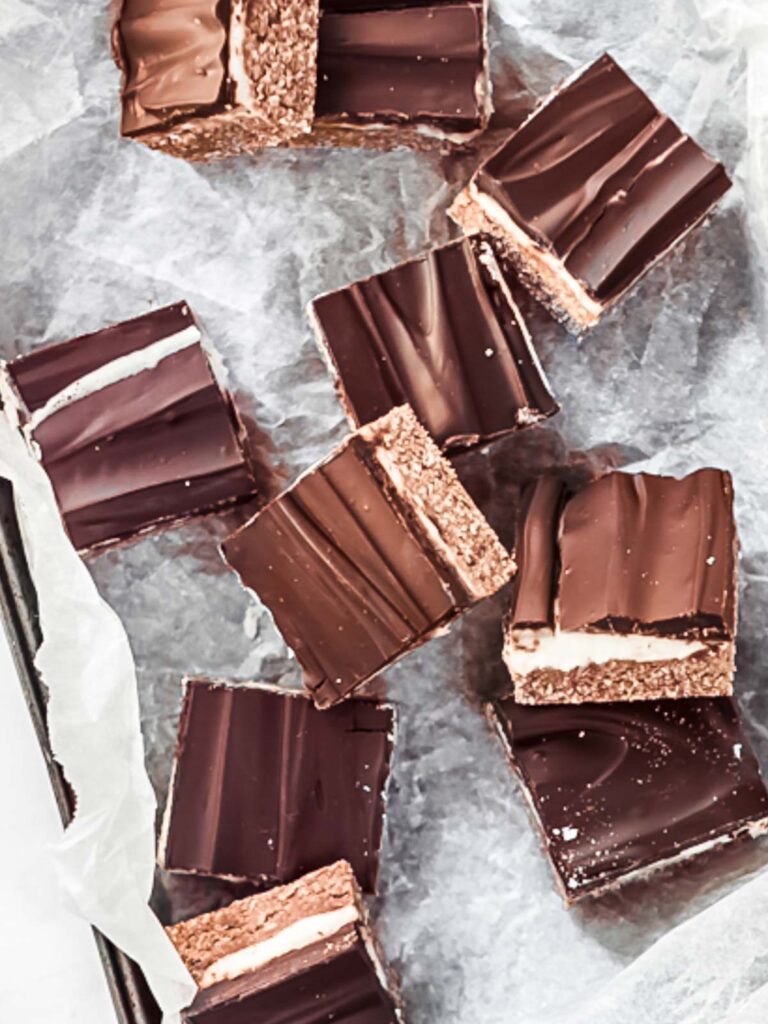
This No Bake Peppermint Slice is the kind of old-school Aussie treat we grew up making with whatever we had in the pantry, which was usually a packet of Marie biscuits, a tin of condensed milk, and a very sweet tooth. It's layered, creamy, and nostalgic in all the right ways. And just like my No Bake Mars Bar Slice and No Bake Caramel Slice, there's, no fuss, and definitely no need to turn on the oven....perfect for me, because we didn't have a functioning oven for most of the '80's!
Whether you're reliving childhood memories or making it for your family, this easy peppermint slice with condensed milk is cool, creamy, and layered with dark chocolate; a true classic that never goes out of style.
Save this recipe 💌
Why You'll Love This No Bake Peppermint Slice 🍫🌿
Customisable: Use a chocolate icing instead of the ganache top for a more traditional twist (see the tip below).
No oven required: A true no-bake classic, with just a bit of fridge time.
Old-fashioned goodness: This is the peppermint slice with condensed milk your mum (or in my case, my sister!) probably made...and now it's yours.
Super simple: Made without fancy equipment.
Key Ingredients
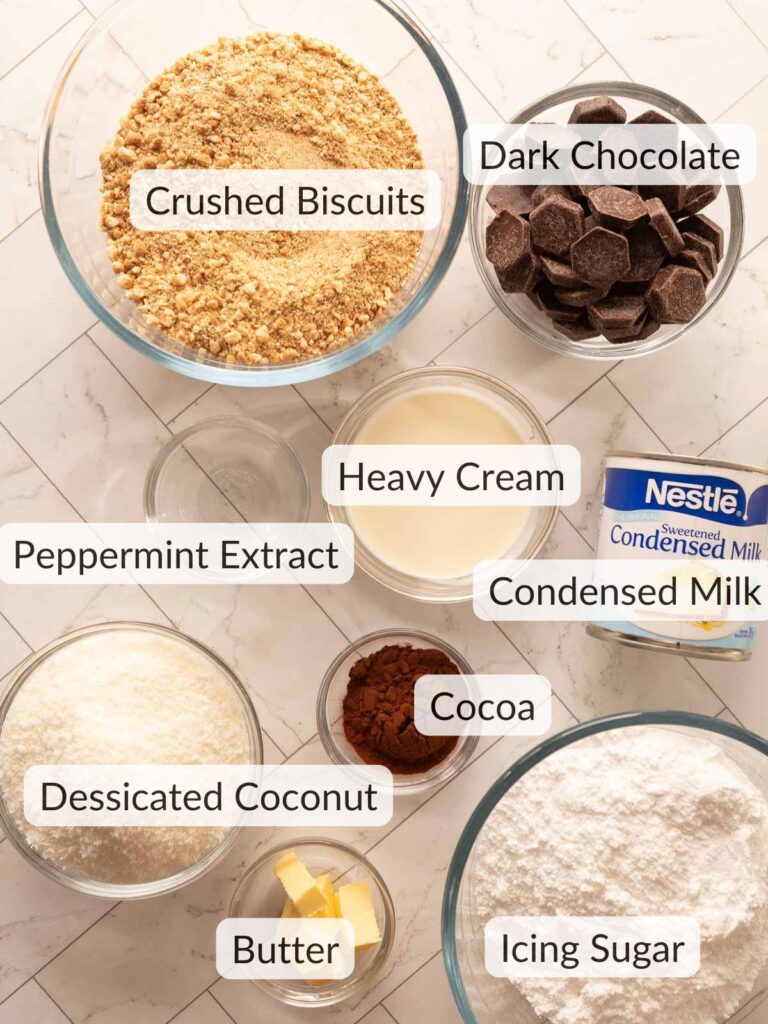
Ingredients for the base
- Marie biscuits: Or any plain sweet biscuit. Crushed with a rolling pin or blitzed in a food processor.
- Condensed milk: One whole tin (395g) - no waste!
- Desiccated coconut: Adds body and sweetness.
- Cocoa powder: For that chocolatey base we all know and love.
Ingredients for the peppermint filling
- Icing sugar: I use pure icing sugar for a smoother result.
- Cream: Just enough to loosen the filling.
- Peppermint extract: Adjust to taste. You want cool and refreshing, not toothpaste!
For the chocolate topping
- Dark chocolate: I use 70% but go with what you love.
- Butter: Helps soften the set chocolate for easier slicing.
How to Make No Bake Peppermint Slice
Step 1: Make the base
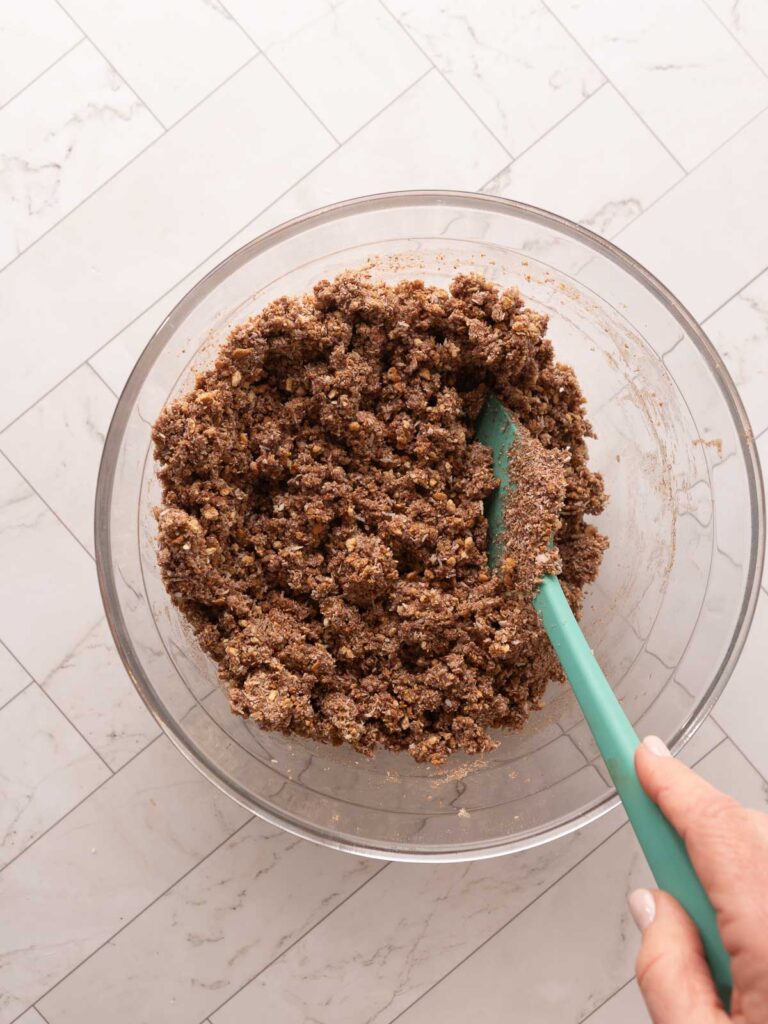
Crush the biscuits (rolling pin or processor), then stir in the coconut and cocoa. Add the condensed milk and mix until well combined. You should have a thick, sticky mixture.
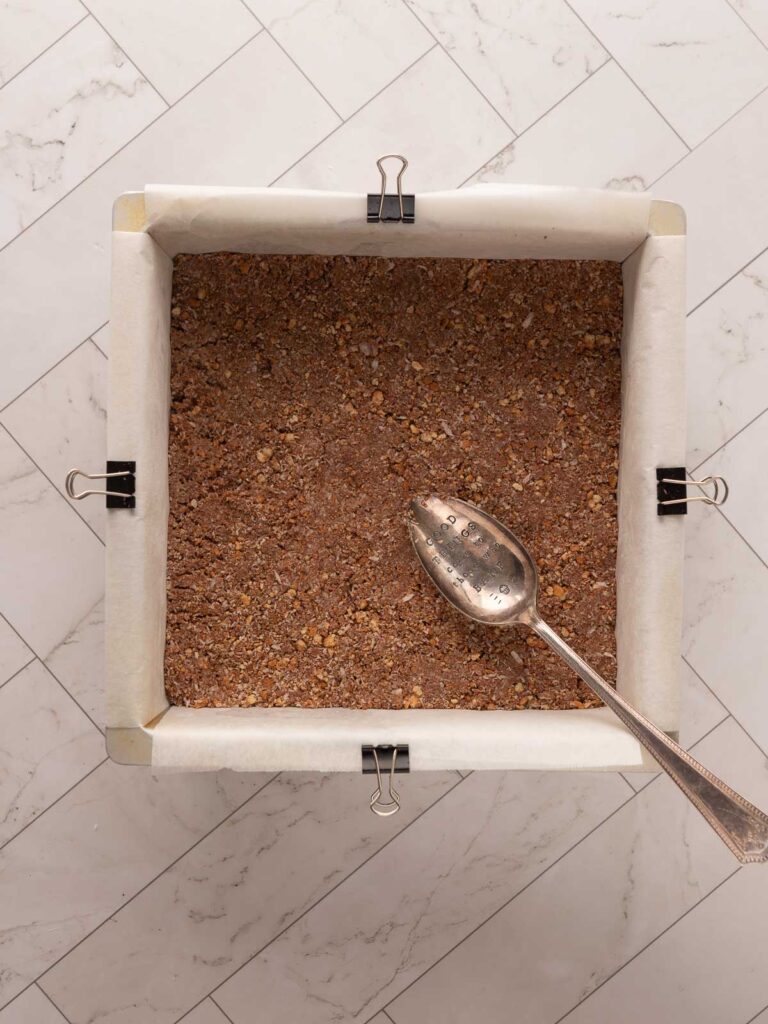
Press it into a greased and lined slice tin (my favourite 20cm square pan works perfectly, or use a 17cm x 27cm slice tin). Smooth the base with a metal spoon. You can also use a piece of baking paper over the mixture, if it's a little sticky. Pop it in the fridge while you make the filling.
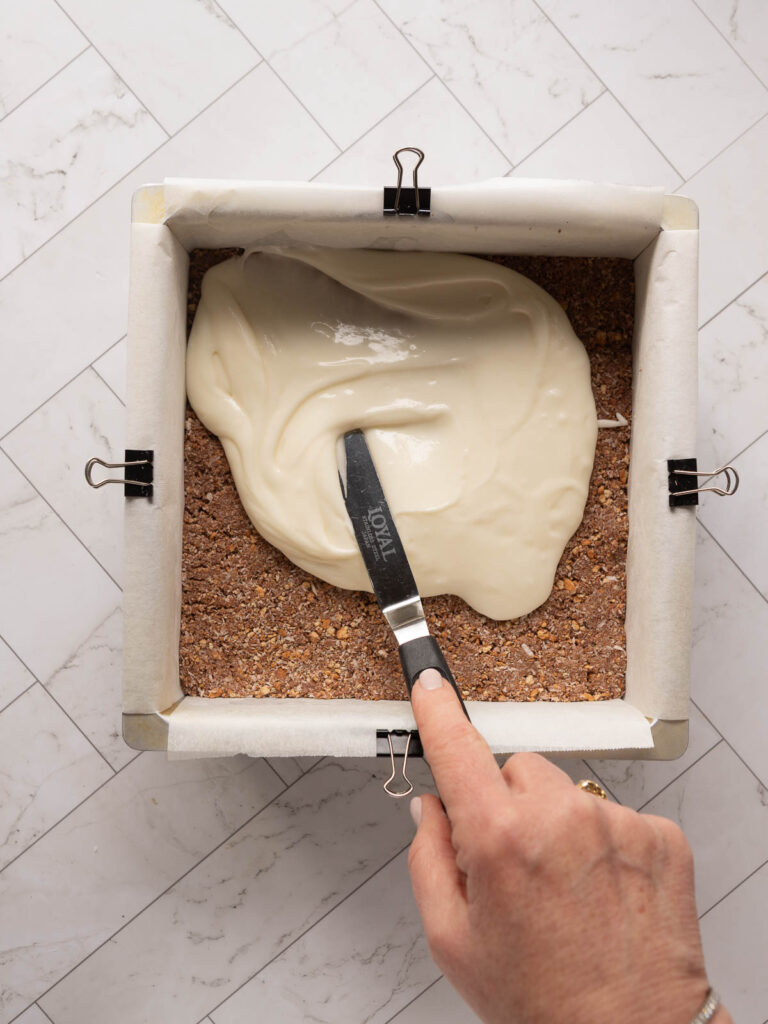
Step 2: Make the Peppermint Filling
Whisk or beat together the icing sugar, cream and peppermint extract until smooth and spreadable. You can use a hand mixer, but I usually just go old school with a butter knife or spatula.
Pour over the base and smooth it out. Chill for 30 minutes.
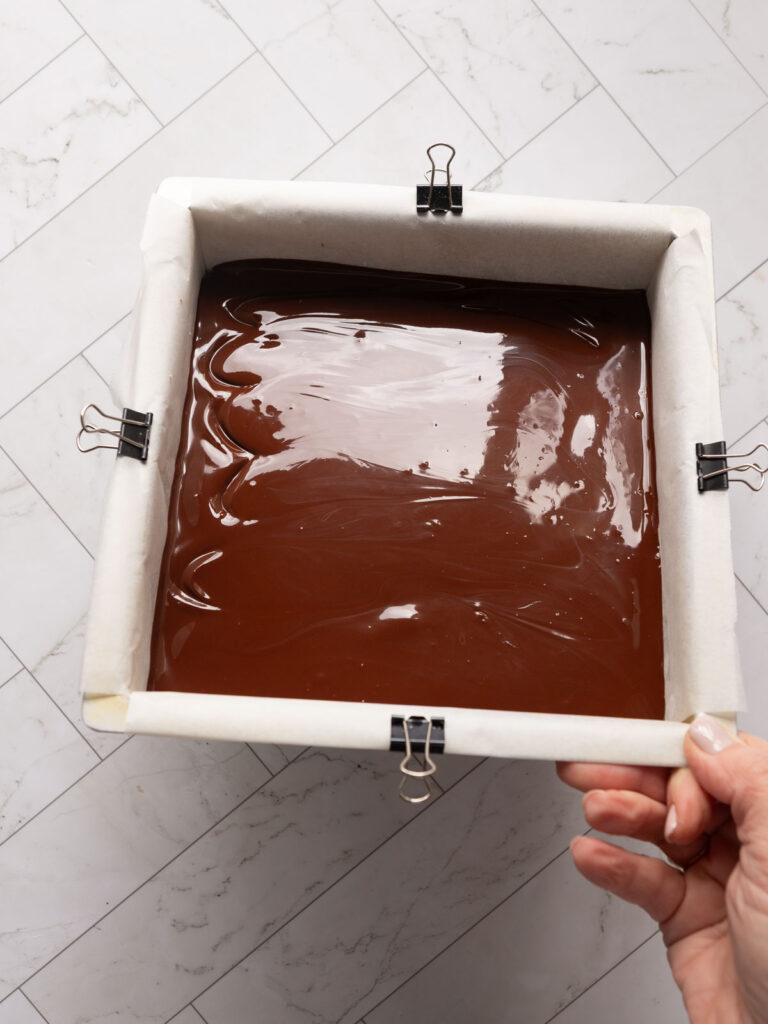
Step 3: Make the chocolate topping
Melt the chocolate and butter together, either in the microwave (short bursts, stirring in between) or a double boiler. Let it cool slightly, then pour over the peppermint layer. Smooth it out and return to the fridge for another 30 minutes or until set.
Optional Thermomix Method (Peppermint Slice Thermomix)
Want to make your Peppermint Slice in the Thermomix? Here's how:
Base: Blitz biscuits for 5 sec / speed 6. Add cocoa, coconut and condensed milk. Mix 10 sec / speed 5, scraping down if needed. Press into lined tin.
Filling: Add icing sugar, cream, and peppermint to bowl. Mix 10-15 sec / speed 4 until smooth.
Chocolate topping: Add chocolate and butter to bowl. Melt for 2-3 min / 50°C / speed 2. Pour over chilled filling.
Topping Variation: Traditional Icing instead of Chocolate
Want that classic peppermint slice icing instead of a firm chocolate top? Try this chocolate icing we used as kids:
- 1 cup pure icing sugar
- 2 tablespoon cocoa
- 40g melted butter
- 1 tablespoon milk
Whisk until smooth and spread over the chilled peppermint filling. This version is softer and easier to cut, and it's perfect for little hands or school lunchboxes.
How to Slice It Neatly
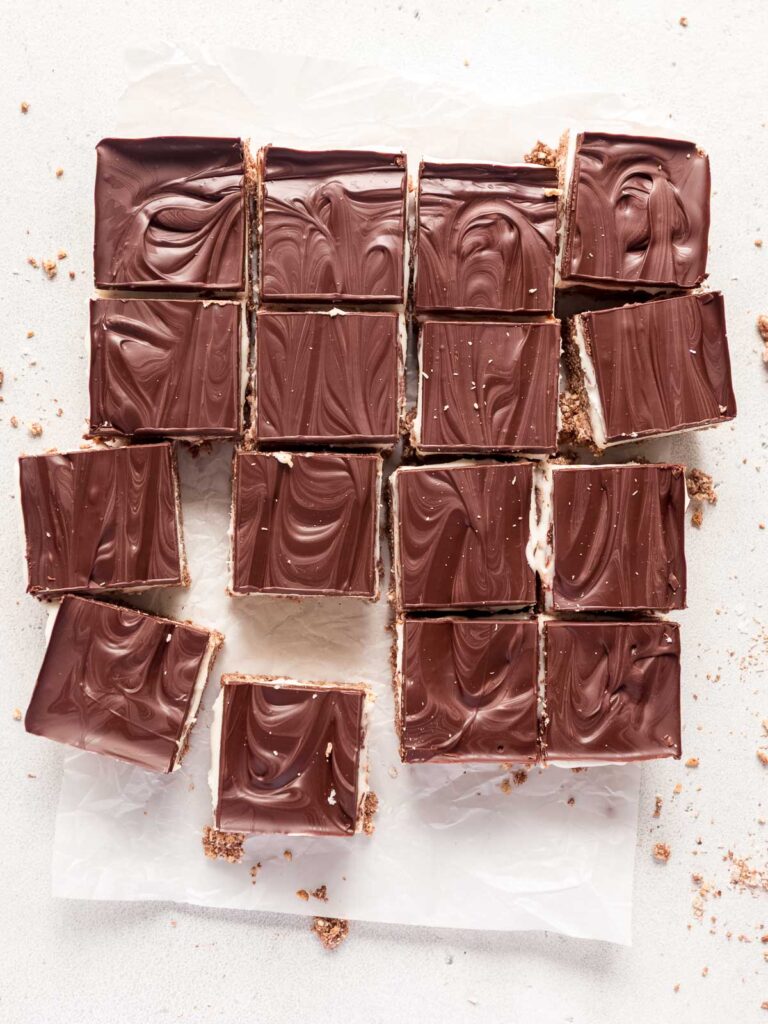
The trickiest part is cutting through that chocolate topping (especially if you use real chocolate). My tip? Heat a large knife in hot water, wipe it dry, and gently press down. Let the heat melt through the top before slicing all the way down. Don't rush, just let the heat do the work - your neat little squares will thank you.
Storage Tips
This slice stores beautifully in the fridge for up to a week in an airtight container. You can also freeze it for up to 3 months - just slice first and freeze in layers with baking paper in between.
Serving Ideas
- Add crushed candy canes at Christmas, for an easy Christmas slice.
- Drizzle with white chocolate for a fancier finish.
- Cut into mini squares and serve as a party treat.
- Add to a dessert grazing board with more of my favourite no-bake slices.
Related Recipes You'll Love
- No Bake Caramel Slice - rich, chewy, and ridiculously simple
- No Bake Mars Bar Slice - gooey, crispy and full of nostalgia
- Jelly Slice - a colourful childhood favourite
- Lemon Slice - creamy and zingy, no oven needed
FAQs
Can I use peppermint essence instead of extract?
Yes, but start with a smaller amount - essence is often stronger and less refined than extract.
How long does peppermint slice take to set?
About an hour total. Chill the filling and topping for 30 minutes each.
Can I double the recipe?
Absolutely! Just use a larger tin and allow a bit more time for each layer to chill.
Is this an old-fashioned peppermint slice with condensed milk?
It sure is! This is the recipe we made in the '70's, '80s and beyond, with pantry staples and no oven in sight.
No Bake Desserts, Served Cold 🧊
This No Bake Peppermint Slice is more than just a sweet treat, it's a freezer-stashed slice from my childhood. The perfect mix of chewy, creamy, and cool, it's just the thing to make when you want something nostalgic and delicious without getting hot in the kitchen.
If you loved this recipe, I'd love you to:
👉 Share it on Instagram (tag me @apple.cake.annie)
📌 Save it to your favourite Pinterest board
💬 Leave a comment below - did you grow up making this Peppermint Slice too?

No Bake Chocolate Peppermint Slice
Equipment
- 1 20cm square pan this is my favourite all-rounder!
Ingredients
Base
- 250 grams plain sweet biscuits (Marie biscuits)
- 395 grams condensed milk
- 150 grams desiccated coconut around 1.5 cups
- 2 tablespoon cocoa powder
Peppermint Filling
- 270 grams icing sugar around 2 cups
- 3-4 tablespoon cream adjust for a thicker or thinner filling
- 2 teaspoon peppermint extract adjust to taste
Chocolate Topping
- 200 g dark chocolate
- 25 g butter
Instructions
Base
- Spray and line your chosen slice pan -I use either a 20cm square pan (my favourite!) or a 17cm x 27cm slice tin
- Using a rolling pin or food processor, crush the biscuits. If using a rolling pin, now place crushed biscuits into a mixing bowl
- Add the coconut and cocoa and mix until just combined
- Add the condensed milk and mix to form a thick paste
- Press mixture into your prepared pan
- Place another piece of baking paper on top of the mixture, then use a metal spoon to smooth out the base (the paper will stop the spoon from sticking). Remove paper.
Peppermint Filling
- Using a palette knife or whisk, beat the icing sugar, cream and peppermint. Mix until smooth. Optional: use a hand mixer.
- Pour filling over base, smooth out and then refrigerate for 30 mins.
Chocolate Topping
- Melt the chocolate and butter either in a double boiler, or in the microwave (see notes). Stir until smooth.
- Allow the chocolate to cool only slightly, then pour it over the base and filling.
- Refrigerate for another 30 mins, before cutting into squares.
Notes
- 1 cup pure icing sugar
- 2 tablespoons of cocoa
- 40g melted butter
- 1 tablespoon of milk
- whisk all ingredients together, until smooth. Spread over the chilled slice.
Nutrition
Save this recipe 💌


Sandra says
Thank you!